Descriptions of The Wormwood, Captain Harrigan’s ship.
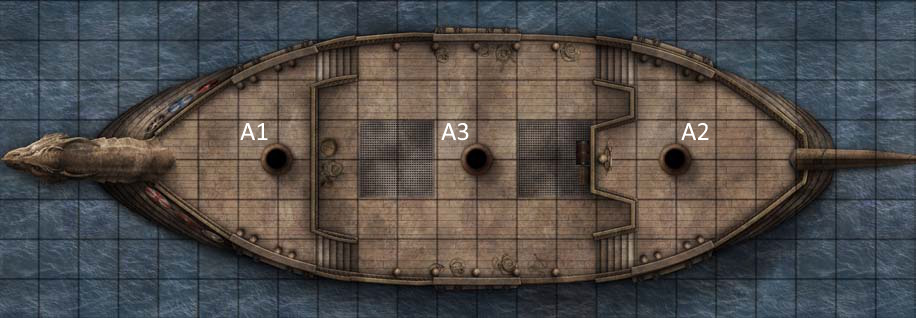
A1. Foredeck: This raised deck stands some 10 feet above the main deck (area A3), immediately behind the bowsprit, which is shaped like a rearing dragon. The foremast rises 30 feet above this deck.
A2. Poop Deck: This raised deck stands 15 feet above the main deck (area A3). The mizzenmast rises 30 feet above this deck. The ship’s bridge protrudes forward of the mizzenmast, and holds the ship’s wheel. The wheel is 3 feet across and has 10 spokes decorated with silver inlays, its bolts carved to resemble kraken heads. An iron cage hangs from the side of the mizzenmast, containing the body of Harmak Gruft, a pirate who beat the captain at dice. Gruft is dead, but his ugly parrot Pluck perches atop the cage, still waiting for its master to awaken. Captain Harrigan and Mr. Plugg spend most of their time on this deck. When the captain is on deck, the poop deck is off-limits to everyone but officers.
A3. Main Deck: The ship’s main deck runs between the foredeck and poop deck. The mainmast rises from the center of the deck, extending 60 feet into the air and topped by a crow’s nest. Rigging connects the mainmast to the ship’s other masts and can be crossed with DC 10 Acrobatics or Climb checks. Several strands of thick rope are secured to the foot of the mainmast for use as a whipping post. The ship’s clock, a macabre brass and copper object depicting worms writhing through whale corpses, hangs from the mast above the whipping post. Not only does the clock keep time, but its bell strikes at dawn and dusk to signal the beginning and the end of the workday. Two 10-foot-square hatches sit in the deck fore and aft of the mainmast. These hatches are thick wooden grilles and open onto the middle hold (area A6) 15 feet below. At the fore of the ship, two doors lead into the officers’ quarters (area A4), while two doors aft lead to the captain’s quarters (area A5). A large wooden box bound in iron sits just beneath the bridge. This sweatbox, used to torment sailors, has just enough room to hold one Medium creature (and can be altered to confine a Small creature). A small jolly boat (same statistics as a rowboat) sits on the deck next to the port rail. It has two sets of oars but no mast. Although designed to carry four Medium passengers, the jolly boat can fit six at a push.
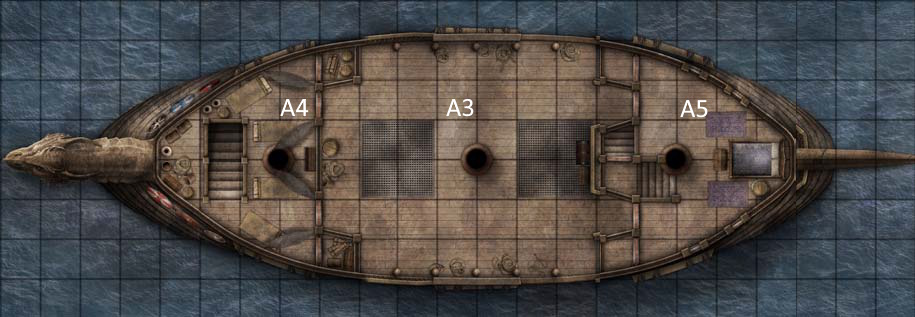
A4. Officers’ Quarters: The ship’s officers occupy the hammocks and sleeping mats in this cramped cabin. A set of steps descends sharply into the middle hold (area A6) below. The two narrow doors leading to the main deck (area A3) are locked and trapped. Mr. Plugg, Master Scourge, Riaris Krine, Peppery Longfarthing, and Habbly Quarne sleep here at night, and at least one of them is often be found here at any given time during the day as well.
A5. Captain’s Cabin: Captain Harrigan’s cabin is richly decorated, its walls covered with intricate carvings depicting krakens devouring whales. A quartet of portholes allow light to drift in, and a bed that can double as a navigational or dining table when the mattress is rolled up sits against the aft bulkhead with a chest at its feet. Two rich carpets flank the bed. A flight of steps leads down to the middle hold (area A6). All the doors are locked and trapped.
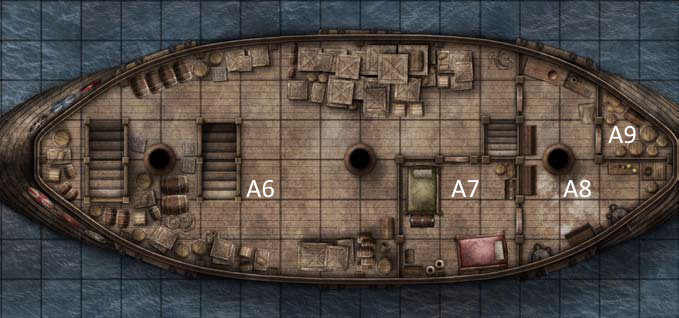
A6. Middle Hold: This is the ship’s main cargo hold. The hold is mostly empty at the start of the adventure, save for the 14 pigs; normally kept caged, they periodically escape and run loose within the hold. In the forward section, a flight of wooden stairs climbs up to the officers’ quarters (area A4), while a second set of stairs descends into the lower hold (area A10). Owlbear Hartshorn is invariably chained to the foremast here to keep him from causing trouble and to keep people out of the officers’ cabin. Another flight of stairs in the aft section next to the galley leads up to the captain’s quarters (area A5), but it is common knowledge among the crew that the door is trapped. Stored near the mainmast are two light ballistas, a disassembled light catapult, and 12 barrels containing 20 gallons of oil each.
A7. Quartermaster and Cook’s Cabin: This tiny cabin contains two beds and two footlockers. The Wormwood’s quartermaster, Cut-Throat Grok, and ship’s cook, Ambrose “Fishguts” Kroop, share this cabin with several of Kroop’s chickens. Grok sleeps here at night, as does Kroop, who is found here during the day as well if he is insensibly drunk.
A8. Galley: The galley is the domain of Ambrose “Fishguts” Kroop, the drunken ship’s cook. The cramped and chaotic kitchen holds two wooden worktables, several wooden cupboards, and two small stoves against the port wall, as well as virtually every cooking utensil imaginable and a frightening array of meat cleavers. A score of chickens and three goats wander freely throughout the chamber; the goats are meant to be caged, but have a distressing tendency to escape their bonds.
A9. Quartermaster’s Store: This cramped storeroom is the domain of Cut-Throat Grok.
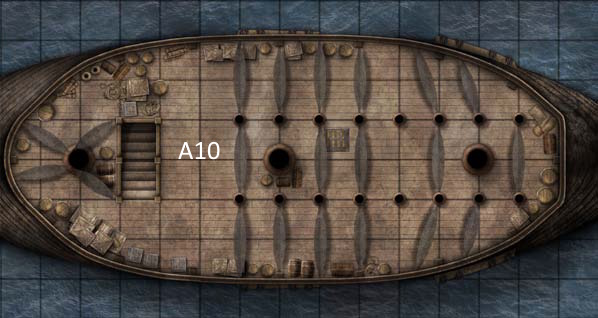
A10. Lower Hold and Crew Berths: Sixteen pillars support the deck above this spacious hold. At night, the Wormwood’s common pirates tie their hammocks between the walls and pillars and sleep until dawn. Two of Mr. Plugg’s toadies, Kipper and Patch Patchsalt, have claimed the far forward section of the hold as their own, and their hammocks are strung between the foremast and the stairs leading up to the middle hold (area A6). A trap door just behind the mainmast opens onto the bilges below (area A11), and requires a DC 10 Strength check to lift. The hold is currently empty of cargo, but several footlockers line the walls. Each member of the crew has a locker, equivalent to a small chest. At the start of the adventure, only 18 of these lockers are in use (see the sidebar on page 14 for their contents), while 22 empty lockers are stacked along the walls.
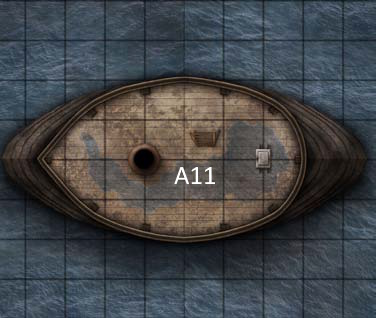
A11. Bilges: